Changing up the Tee
It's time to sew up some cool tees for the boys in your life. Welcome to my stop on the "Change up the Tee" blog tour, hosted by Made for Little Gents.
For the tour, Get Your Crap Together Patterns (GYCT) provided a copy of the Primary Tee to play around with. This tee has all the great options I love in a tee pattern - simple shape, options for long or short sleeve, a good size range, and even a pocket.
Keep reading for a discount code and giveaway!!

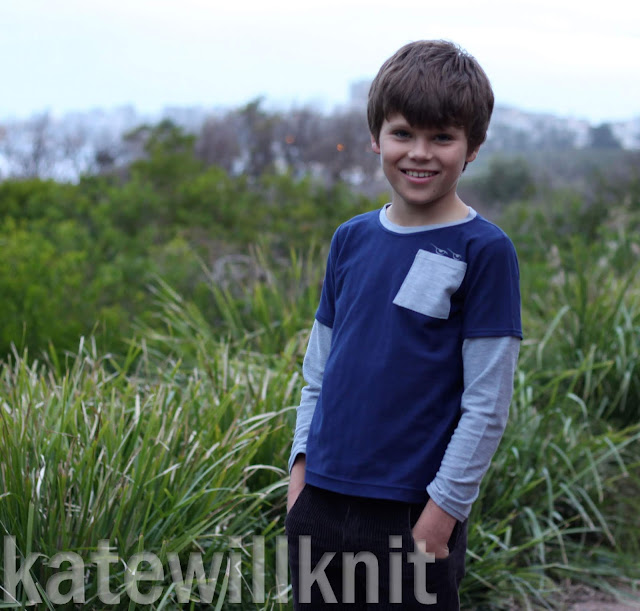
When I was looking at options for mixing up the tee, I decided I wanted to do a faux double sleeve - where it looks like there is a longer sleeve tee underneath the short sleeve one. And just for fun, I wanted to add a HTV (heat transfer vinyl) image.

The faux double sleeve is a pretty easy hack. First of all I marked up my pattern piece for the long sleeve. I placed the short sleeve pattern piece on top of the long sleeve pattern, and traced the lower edge onto the long sleeve. Then I measured the hem length, and marked that further up the sleeve (keeping it parallel to the short sleeve mark) - this will now be the top of the long sleeve.

To add the faux double sleeve, make the tee as if it were a short sleeve version, but don't hem the sleeves. Press the short sleeve hem in place. Sew up the seam of long sleeve, and hem.

Align the top raw edge of the long sleeve with the turned up edge of the short sleeve hem, and pin in place. To do this I pinned once on the inside, then again from the outside, removing the initial pins once everything is in place.

Hem the short sleeve, sewing in the long sleeve in the process. It's probably easiest to do this with the sleeve inside out presser foot on the 'inside' (right side up).

Now you have a faux double sleeve and a tee that is warmer, but so much 'cooler'.

When making my version I didn't properly think through the process, and sewed up both sleeves separately, then sewed them in as for set in sleeves. I think this did make it easier when sewing the long sleeves in place. And it was very easy to set in the sleeves. So this would be another option for construction.

For an extra perk, I added some eyes, peering out the top of the pocket. I made them with heat transfer vinyl (htv), cut on my Silhouette Cameo. I have wanted to do this for a couple of years now, but it had always been pushed to the bottom of the list - hooray for this blog tour!

I ran into a little trouble trying to affix the vinyl. We recently purchased a new iron, and it's a steam iron (sooooo good for getting out wrinkles). Unfortunately, steam irons aren't any good for affixing htv. I was contemplating a trip up the road to borrow an iron, but came up with an alternative - my hair straightener! I used parchment paper either side of the tee, and the plates of the straightener were just the right size for the transfer.

More pattern details: it's available in sizes 12 months to 12 years. Options for long sleeve, short sleeve and a pocket. It's even got an option for a knee or mid-calf length dress version.
Until July 18, you can save $2 when you buy the pattern, using the code "SEWBLUE".
The official verdict .... It's a winner! This boy is very happy with his new tee. And I'm pleased I had the opportunity to play around with the pattern. I'm excited to see what the others on the tour have come up with, and have a go myself.
 Thanks for reading! Check out what other bloggers are doing and come up with ideas for changing up the tee by following along with the blog tour below:
Fri. June 29 Made for Little Gents (Intro to Tour)
Mon. July 2 Family of Makers
Tues. July 3 Made for Little Gents
Wed. July 4 Frullemieke
Thurs. July 5 Made by Laura!
Fri. July 6 Auschick Sews
Mon. July 9 Kate Will Knit | Sew Cute Couture by Kathy
Tues. July 10 Tenille's Thread | Mahlica Designs
Wed. July 11 Momma Newey's Makes | Our Play Place
Thurs. July 12 My Sewing Roots | Elli and Nels
Fri. July 13 Dreams and Stitches | Stylin' Stacy

For the tour, Get Your Crap Together Patterns (GYCT) provided a copy of the Primary Tee to play around with. This tee has all the great options I love in a tee pattern - simple shape, options for long or short sleeve, a good size range, and even a pocket.
Keep reading for a discount code and giveaway!!

When I was looking at options for mixing up the tee, I decided I wanted to do a faux double sleeve - where it looks like there is a longer sleeve tee underneath the short sleeve one. And just for fun, I wanted to add a HTV (heat transfer vinyl) image.

The faux double sleeve is a pretty easy hack. First of all I marked up my pattern piece for the long sleeve. I placed the short sleeve pattern piece on top of the long sleeve pattern, and traced the lower edge onto the long sleeve. Then I measured the hem length, and marked that further up the sleeve (keeping it parallel to the short sleeve mark) - this will now be the top of the long sleeve.

To add the faux double sleeve, make the tee as if it were a short sleeve version, but don't hem the sleeves. Press the short sleeve hem in place. Sew up the seam of long sleeve, and hem.

Align the top raw edge of the long sleeve with the turned up edge of the short sleeve hem, and pin in place. To do this I pinned once on the inside, then again from the outside, removing the initial pins once everything is in place.

Hem the short sleeve, sewing in the long sleeve in the process. It's probably easiest to do this with the sleeve inside out presser foot on the 'inside' (right side up).

Now you have a faux double sleeve and a tee that is warmer, but so much 'cooler'.

When making my version I didn't properly think through the process, and sewed up both sleeves separately, then sewed them in as for set in sleeves. I think this did make it easier when sewing the long sleeves in place. And it was very easy to set in the sleeves. So this would be another option for construction.

For an extra perk, I added some eyes, peering out the top of the pocket. I made them with heat transfer vinyl (htv), cut on my Silhouette Cameo. I have wanted to do this for a couple of years now, but it had always been pushed to the bottom of the list - hooray for this blog tour!

I ran into a little trouble trying to affix the vinyl. We recently purchased a new iron, and it's a steam iron (sooooo good for getting out wrinkles). Unfortunately, steam irons aren't any good for affixing htv. I was contemplating a trip up the road to borrow an iron, but came up with an alternative - my hair straightener! I used parchment paper either side of the tee, and the plates of the straightener were just the right size for the transfer.

More pattern details: it's available in sizes 12 months to 12 years. Options for long sleeve, short sleeve and a pocket. It's even got an option for a knee or mid-calf length dress version.
Until July 18, you can save $2 when you buy the pattern, using the code "SEWBLUE".
The official verdict .... It's a winner! This boy is very happy with his new tee. And I'm pleased I had the opportunity to play around with the pattern. I'm excited to see what the others on the tour have come up with, and have a go myself.
Thanks for reading! Check out what other bloggers are doing and come up with ideas for changing up the tee by following along with the blog tour below:Fri. June 29 Made for Little Gents (Intro to Tour)
Mon. July 2 Family of Makers
Tues. July 3 Made for Little Gents
Wed. July 4 Frullemieke
Thurs. July 5 Made by Laura!
Fri. July 6 Auschick Sews
Mon. July 9 Kate Will Knit | Sew Cute Couture by Kathy
Tues. July 10 Tenille's Thread | Mahlica Designs
Wed. July 11 Momma Newey's Makes | Our Play Place
Thurs. July 12 My Sewing Roots | Elli and Nels
Fri. July 13 Dreams and Stitches | Stylin' Stacy
Ready for the giveaway to GYCT Designs Shop?
Here you go! Good luck!


Great job! I love how you've done those sleeves! I'm going to have to do that too at some point!
ReplyDeleteSo cool! Love the layered look!
ReplyDeleteYou did such a great job on this! Thanks for sharing how you made the sleeves. It gives such a nice extra touch, and it's much nicer this way than having the bulk by wearing two shirts. :)
ReplyDeleteGreat tutorial, and a very cool result too.
ReplyDeleteReally like this version!
ReplyDelete